This gives you access to the database with all your current reservations.
You can search for any details via search box or the date options, you can also show historic and cancelled reservations by clicking on the relevant button.

You also have the advanced filter where you have numerous other options to filter reservations such as booker email or room number.
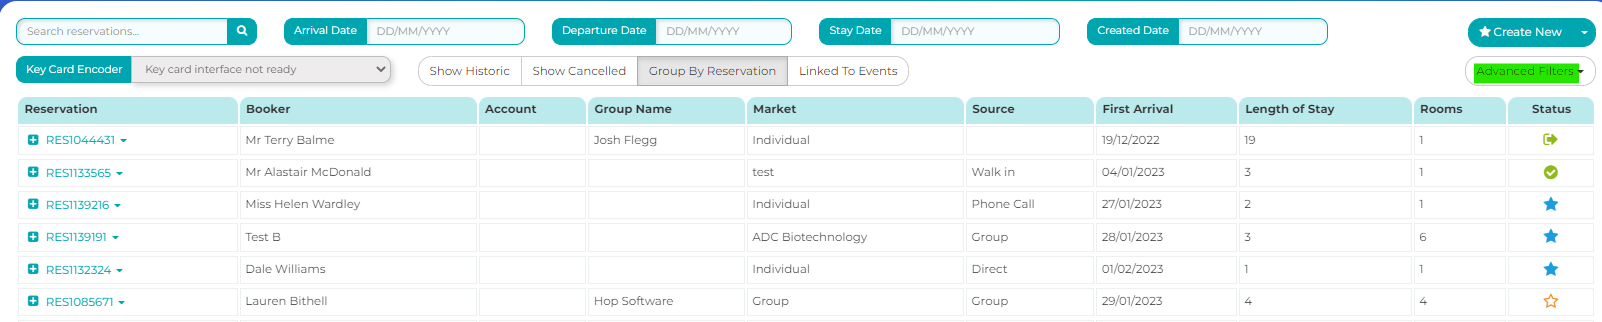

You can also sort the view order by clicking on any of the column headers, for example clicking on booker will sort them by surname A-Z, if you click on booker again it will sort Z-A.
This applies to all column headers so you have a good range of options on how to view the information on this page.

Viewing by group reservation will show all rooms (RESX) not just the reservation (RES) so the view will be slightly different.
This is useful if you have reservations with more than one room.
Viewing this way also shows the price, room balance and reservation balance.

Click the + button to open room reservation.
If there are multiple rooms on the reservation, they will all be listed here and show room type, guest name/s, number of guests, arrival date, rate plan and room number if allocated.


Click the v button to open a drop down menu for further options.

Edit Reservation - you can amend any details of the reservation and add or amend notes for internal use. Save changes before leaving this page.
View Transactions - this is a record of all financial transactions; room charges are also added here.
Payments, manual charges or discounts are all added here by selecting the +Add transactions and entering details like payment method and amount.

Refund or void transactions by selecting tick box, subject to user rights.
View Table Bookings - this option is only available if you have Res Diary or SevenRooms linked to your account. You can see if the guest has a table booked here and also book or cancel a table from here.
Print or Email Invoice (including additional info) - you can get an invoice as a PDF by clicking “Print Invoice”, if you select “Email Invoice”, it will be sent straight away to the contact associated with the reservation. (selecting 'including Additional Info' will include the info on the invoice.
Get Registration Cards - clicking on this will download the registration card/s as a PDF.
Reserve again for - clicking this will open a new reservation and will have certain fields pre filled in like the date, name, room type, rate plan to match the current reservation. You can be change these easily if you need to.
Mark as Provisional - this does exactly what it says and will mark the reservation as provisional.
Preview Confirmation - you can preview the confirmation and even edit it before you send to the guest if you want to add or remove any information.
Re-send Confirmation - this is a one-click step to re-send the confirmation email should you need to.
Print Confirmation - if you need to print the confirmation to give to a guest in person or post it you can do this here.
Check In - this will check the guests in.
Paperless Check In - this will only work if you have this set up. Instead of using printed registration cards, you can direct the guest to any touchscreen device, like a tablet, to allow them to check themselves in.
Cancel Reservation - if you need to cancel the reservation you can do this from here.
No Show - you can recategorize as a “no show” from here. Clicking on this will show a pop up asking you to confirm if you would like the no show to be charged in full (if automatic payments are set up) or no charge should be taken.
Send Custom Email - you can send a custom email here if you have created any. If you have multiple set up you can choose the correct one from the drop down menu. These emails can be set up under the template type Reservation Level Manually Triggered (to send from the RES or Room Level Manually Triggered to send from the RESX.
Send Custom SMS - you can send the guest a custom text (SMS) message here if you have SMS enabled on your property. For more information on this please click here.
Send Custom Push Notification - if the guest has push notifications configured this is where you can send a push from.
Create Reservations
By clicking on the “Create new” button a new screen will open, allowing you to enter details for a new reservation.

In the “booker” field, add the name of the guest (if the guest has already stayed with you, an entry from your CRM database will populate this field if you enter the guest’s name, for a new guest, click the “+” sign right of the “booker” field.
The fields room type, rate plan and booker are mandatory.

Click “next” on the bottom right to proceed to the “rooms” tab.
You can assign a room to this stage, but you can also do this at a later stage.
If you assign a room and click on the padlock icon, it will appear as “locked”, meaning the guest cannot be moved to a different room.

Click “next” on the bottom right to proceed to “charges”.
You have the option to edit the room rate at this stage.
If you tick the “charge to rooms” box, you can select articles (like food and beverages, services, e.g.) to be charged to the room.
Click “next” once more to proceed to the “summary” tab. This will list an overview of your booking.
From here, you can mark the reservations as “provisional” or “confirmed”. If you select “confirmed” an email will be sent to the booker if they are enabled.
Was this article helpful?
That’s Great!
Thank you for your feedback
Sorry! We couldn't be helpful
Thank you for your feedback
Feedback sent
We appreciate your effort and will try to fix the article